Window Film & Glass Tinting Installation Guide
Window Film Tinting Instructions: For Residential and Commercial glass film
DOWNLOAD PDF
Note: Read all the instructions carefully before beginning installation of the glass film
Hint: Make sure all the application tools are present before starting application.
• Do not apply any ammonia based glass cleaning products before or after application.
• Cleaning the glass is very important, so prepare and clean the glass as thoroughly as possible.
• Application is easier if the glass is cool, so try and wait until the sun is not directly on the glass. If you have no choice, you will need to use more ‘SLIP’ liquid in your mix of water and slip solution.
• When filling spray bottle, fill with water first. Please use clean water, because dirt and sediment can get trapped in the film and cause small bubbles.
• Start at the smaller windows first and work your way to the larger windows.
• Handle the film very carefully. As with aluminium foil, once creased, the film will remain creased.
• Larger windows (3-5 feet or 1-2m wide) usually are best applied by two people working together to remove the backing sheet.
• Work in a dust-free area.
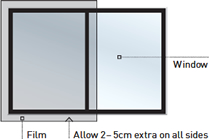 STEP 1: Measure the glass
Measure the size of all the glass carefully before you begin to cut out the film. Allow for as little wastage as possible.
Find a clean, flat, open area to cut the film to size.
Be sure to allow approximately 2 – 5cm extra film on each side of the glass when cutting out.
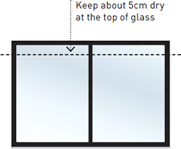 STEP 2: Cleaning the glass
Clean the glass as thoroughly as possible. Spray the glass surface with the film slip mixture. (Fill your spray bottle with water and add one capful of liquid concentrate.) If you have timber windows pay special attention to the edges make sure you have a clean straight edge. Also clean the frame around the glass.
If there is any grit or paint on the glass use the scraper blade to clean the glass surface. Wipe away any dirt or grit from the edges of the glass. Once clean spray the glass surface again, trying not to spray the top edge as this will cause dirt and grit to run down the glass surface. Spray the edges thoroughly so that the water runs down the edges of the glass, taking with it any dirt or grit.
 STEP 3: Applying the film
Making sure the glass surface has plenty of liquid solution on it, take your pre-cut piece of film and carefully peel back the protective liner on the fi lm.
Note: The job will be made much easier if you are using the straight edge of the film on the top of the glass.
Helpful hint: If you have a larger window nearby, spray that window then place the film on the wet glass, and peel the liner off from there.
 It is much easier when applying to larger windows to have two people peeling the liner off the fi lm. Be sure to peel the film and the liner in opposite directions. Once the liner is removed spray the exposed surface of the film. Holding the top right and left corners of the fi lm carefully apply to the glass surface.
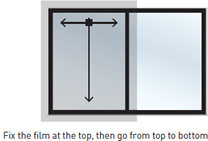 STEP 4: Fixing film to glass surface
Once the film is on the glass with the film edges overlapping evenly on each side, it is now time to fix the film to the glass.
Spray the surface of the film and take your application squeegee. Slowly push the water from under the film, starting from near the top squeegee from left to right, then from centre top to bottom. Then take the squeegee and push out the rest of the water from under the film.
Note: Do not go to close to the edges.
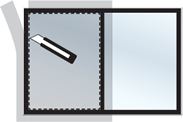 STEP 5: Trimming film to size
Use your cutting knife to trim the excess film by slicing it along the outer edges of the glass window, making sure your blade is sharp.
Helpful hint: Use your application squeegee as a guide by smoothing down the film towards frame.
Once trimmed to size, squeegee out all of the water from under the film. If spears appear on the edge of the film, take your application card and wrap the micro-fibre cloth around it, push out the spears slowly.
Allow film to cure for about 3 – 7 days depending on how much sun the glass is exposed to direct sunlight.
 |
 |
 |
 |
 |
 |
|---|---|---|---|---|---|
|
Measuring tape |
Scraper blade |
Spray bottle |
Application card |
Squeegee |
Knife |


 Looking for an installer?
 Tint Simulator
